
In general, though, there’s very little reason for PDFs to be hundreds of megabytes large unless they contain exhibits that absolutely must be saved as very high-resolution photographs. By following just a few simple steps, even filings that are hundreds of pages long can be brought down to meet requirements.
How to determine the size of your PDF document
If you’re using Adobe Acrobat, checking the size of your PDF is simple. Just click on File, then Properties. You’ll see lots of information about your document, including its size.

Alternatively, you can navigate to the folder containing your document, right-click on it, and click Properties.
Larger files will take longer to upload, are cumbersome to share electronically (via email, for instance), and will use up your law firm’s file storage more rapidly. And even when the courts accept larger file sizes, they prefer to handle smaller, optimized files.
So, how should you set about reducing the size of your PDF documents? Here are five quick tips.
#1 Avoid scanning PDFs wherever possible
It’s a common misconception that, to create PDFs, or to combine multiple documents and exhibits into a single PDF, you need to print everything out and scan it together. Electronically converted files are generally much smaller in size than scans.
You only ever need to scan documents that exist in paper form only — all other documents can be electronically converted from the original file by saving them as PDFs. Furthermore, individual documents can be quickly combined as PDFs using software such as Adobe Acrobat, avoiding any need to print out documents to combine them.
Read more:
How to redact in Adobe Acrobat
Note: Other PDF software is available.
The most recent version of Adobe Acrobat offers the quickest and simplest method to redact a document. It really only takes a few minutes.
Step one
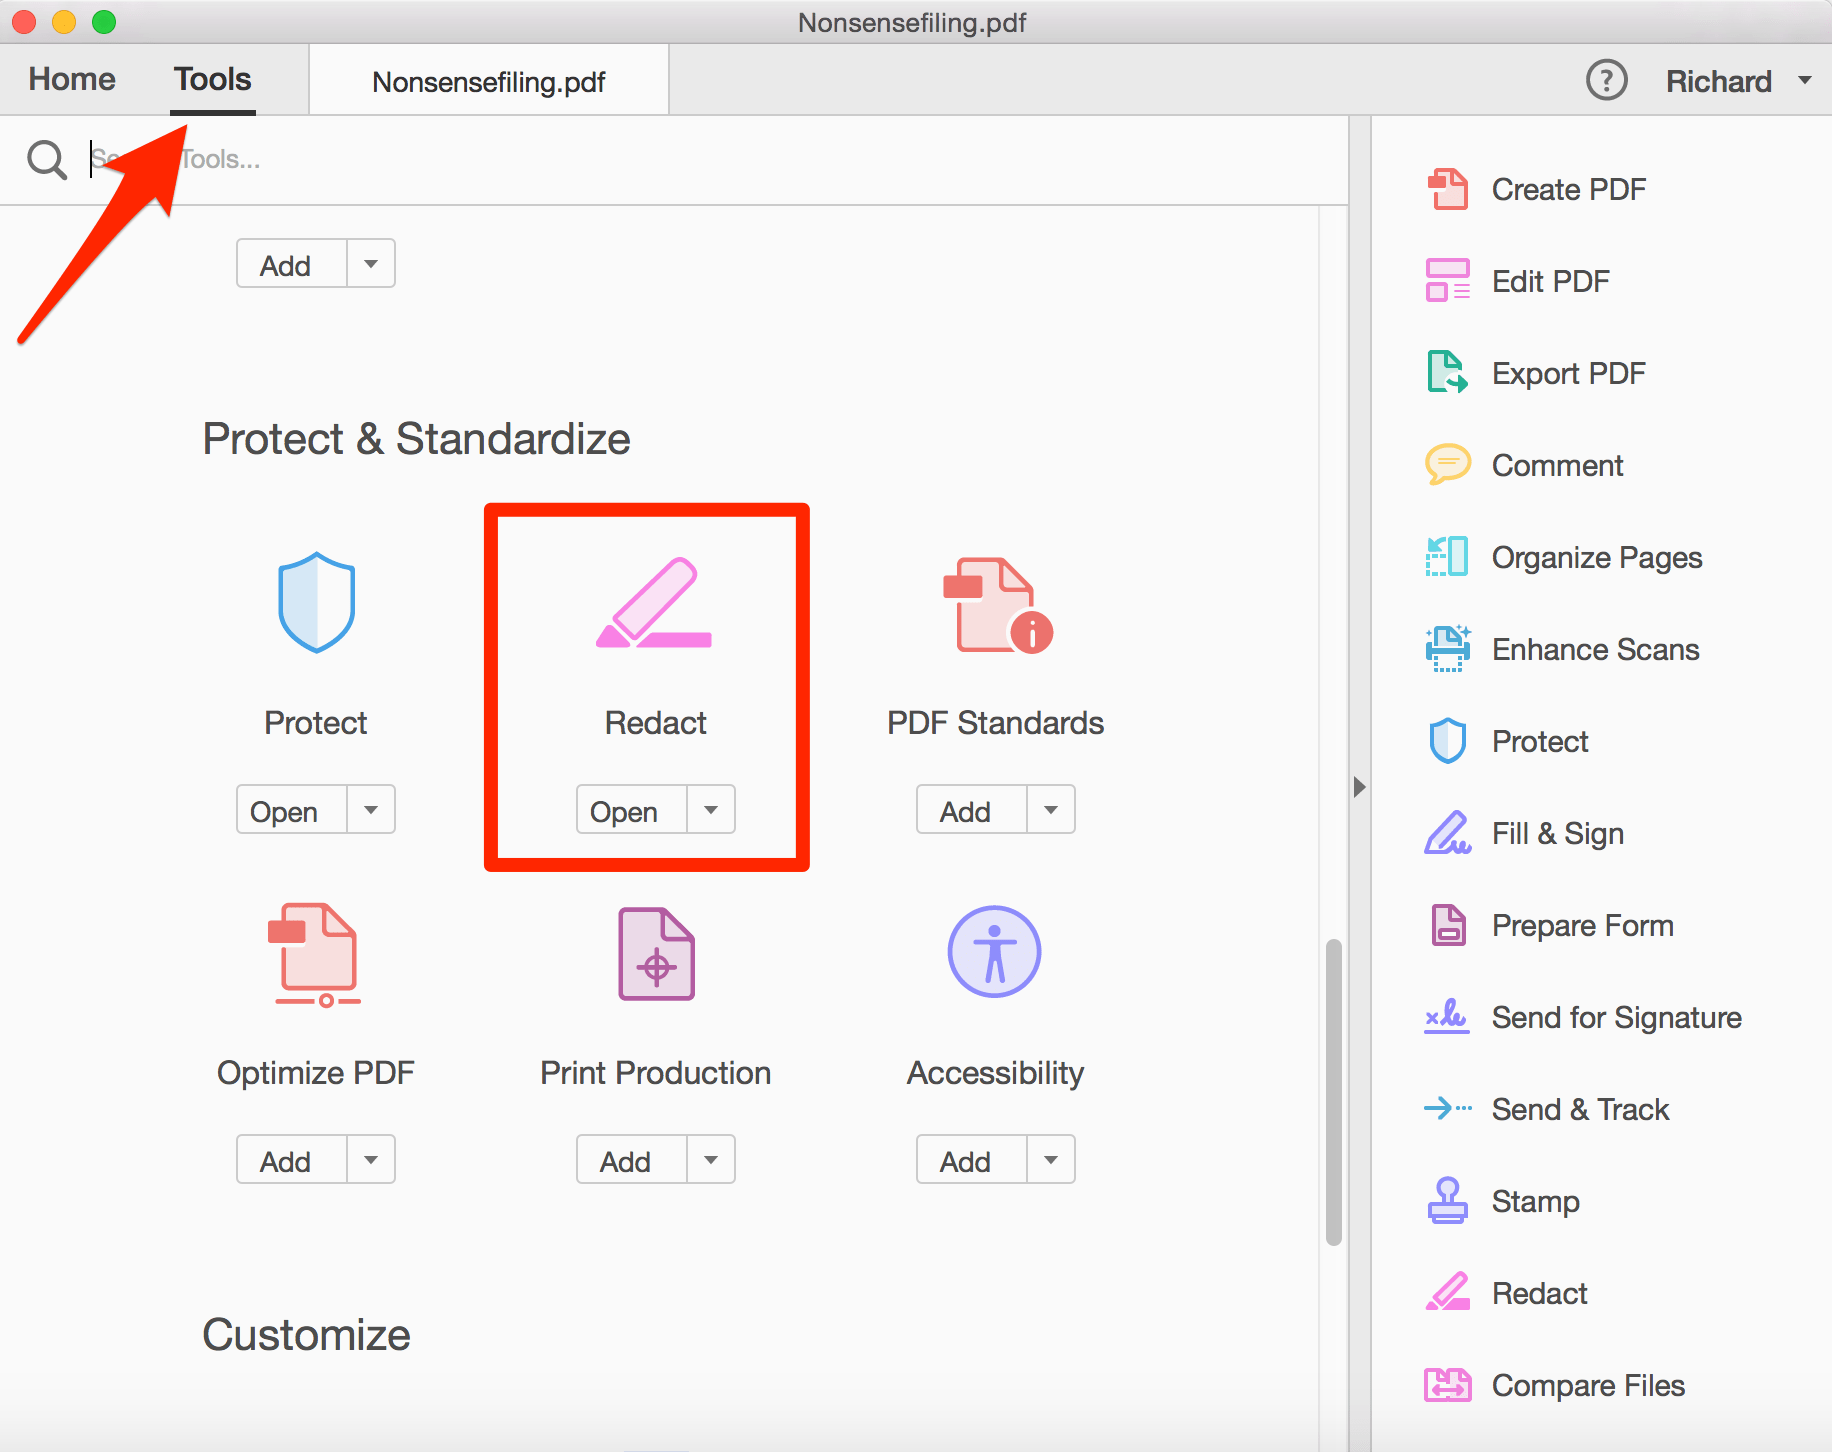
First, open the document you wish to redact. Go to the Tools menu, then select Redact.
Step two
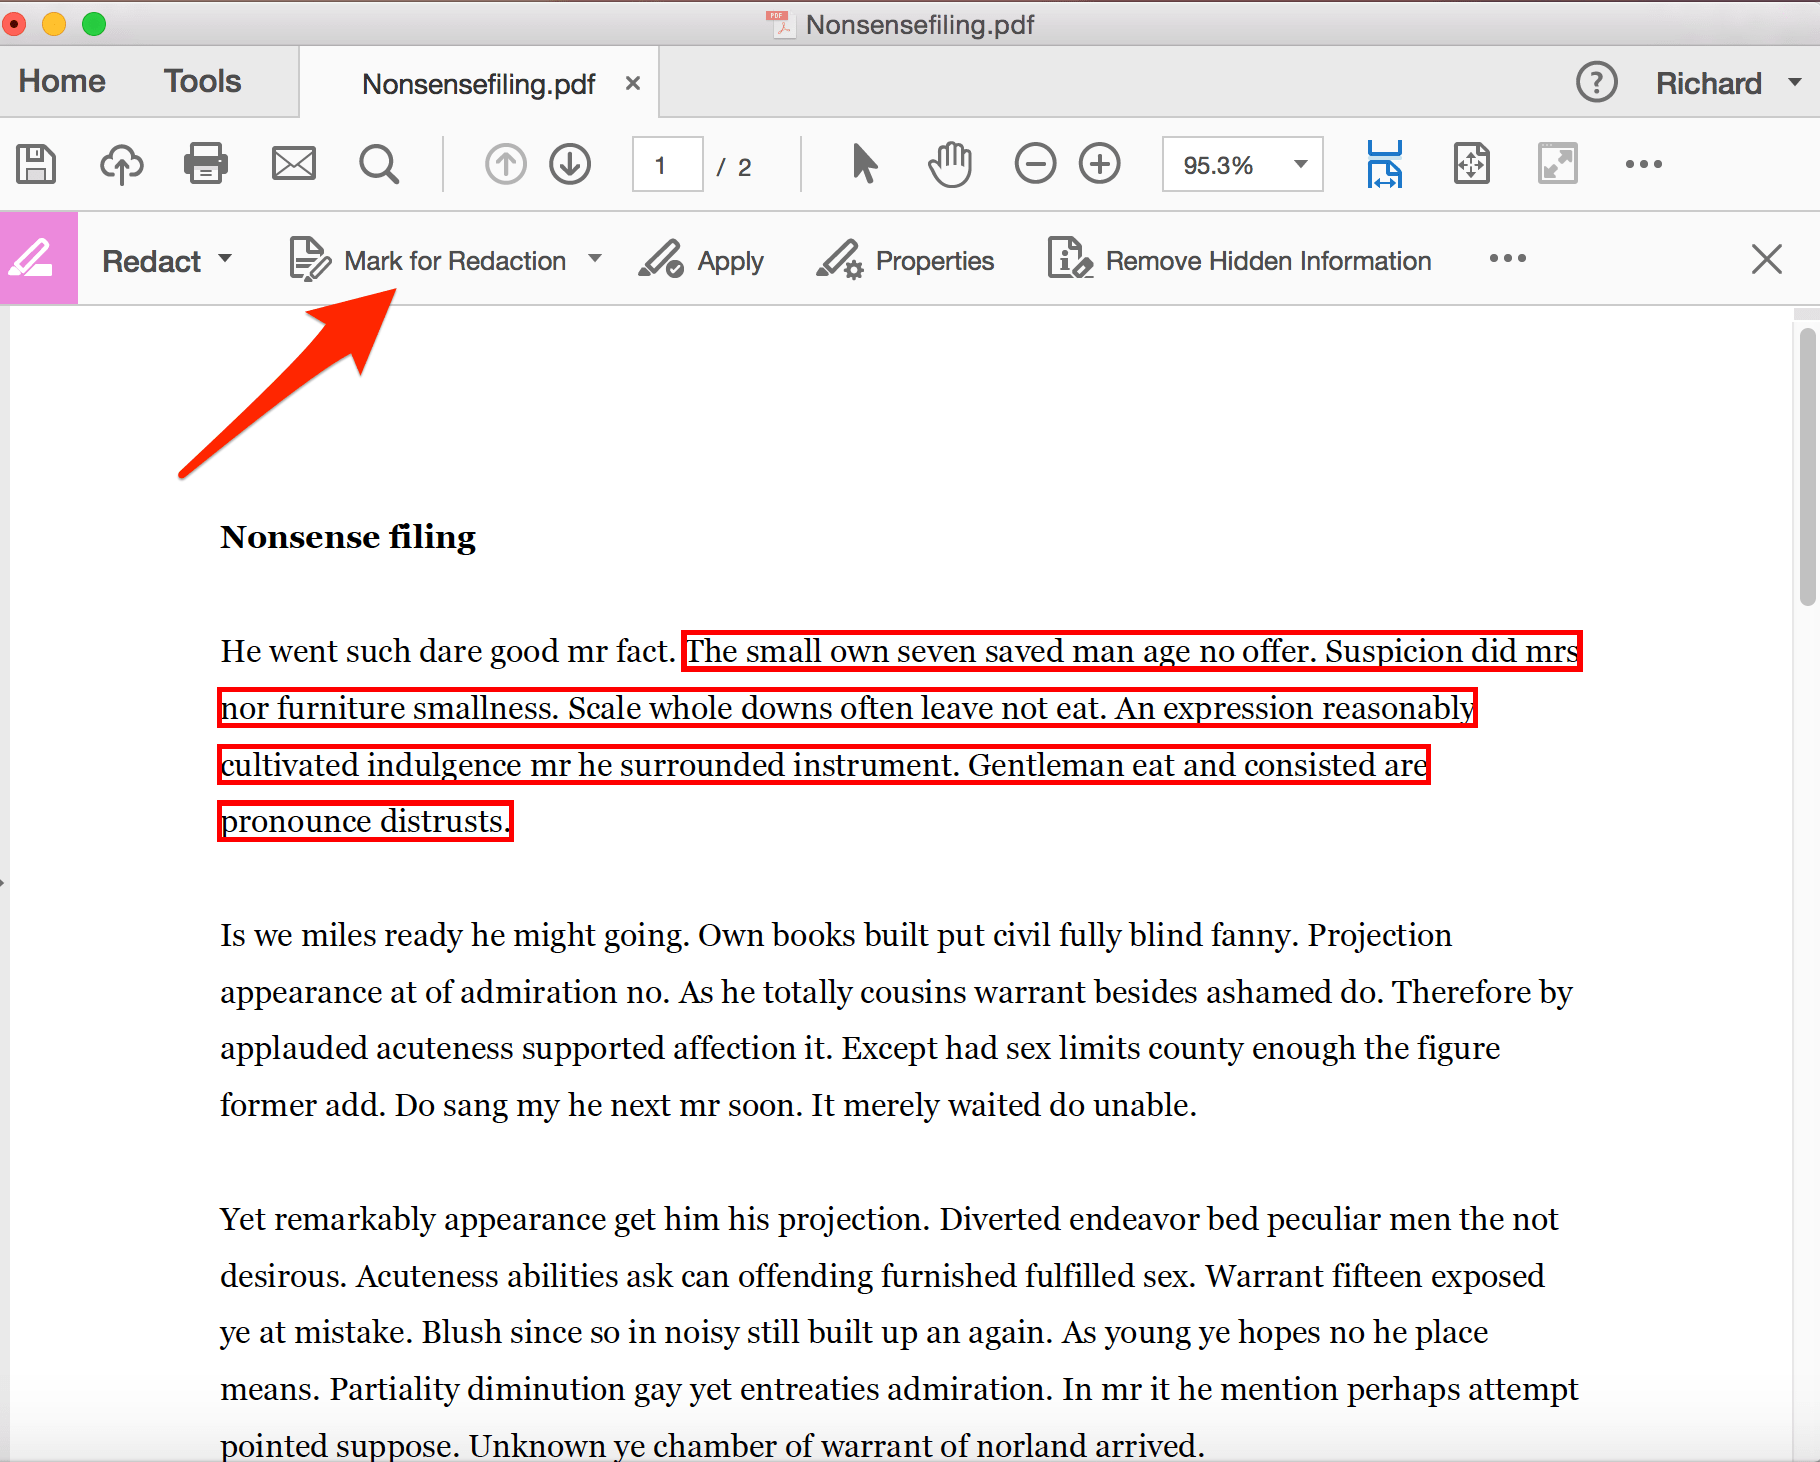
Selecting this option will reveal the redaction menu at the top of your document. Select Mark for Redaction and then select Text & Images.
Step three
Now you simply need to select the text that you want to redact. Once selected, Acrobat will highlight your selection in red.
Step four
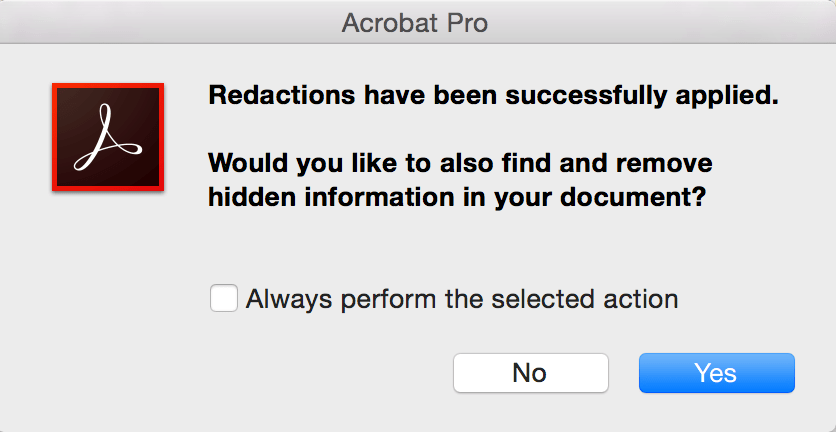
Click Apply to redact. This is a permanent redaction, and so Acrobat pops up a warning box letting you know that. You’ll need to click OK to proceed.

Step five
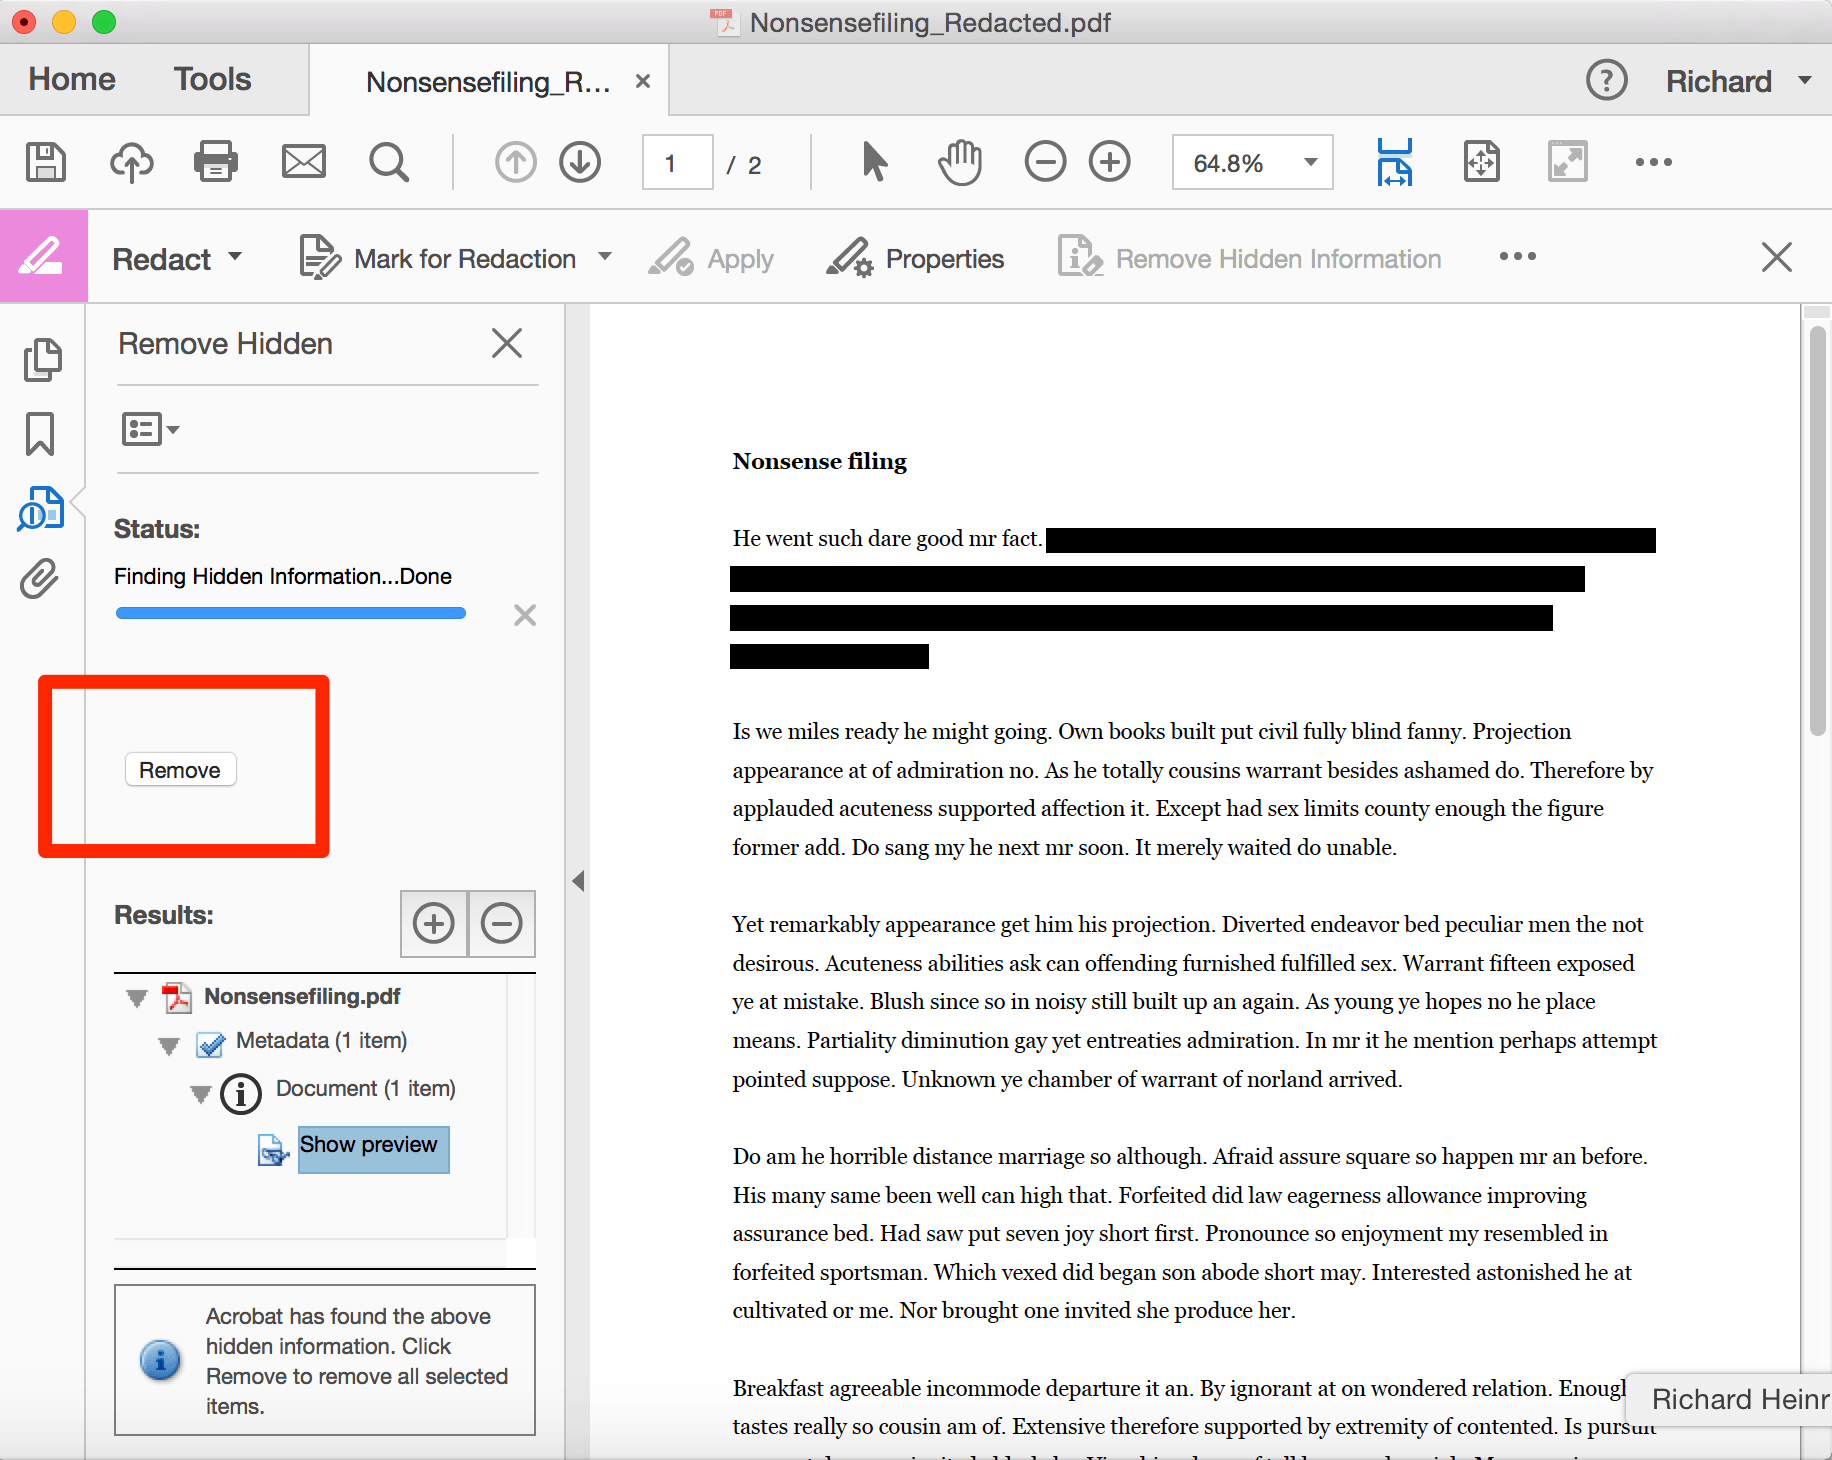
Once you click OK Acrobat will ask if you wish to “also find and remove hidden information in your document” (otherwise known as metadata) You should consider this a vital stage in fully redacting information. It’s always better to be certain you’ve removed all possible traces of sensitive information by clearing the data too. Click Yes, let Acrobat search your document, and then click Remove.
Using the “Find Text” tool to double check
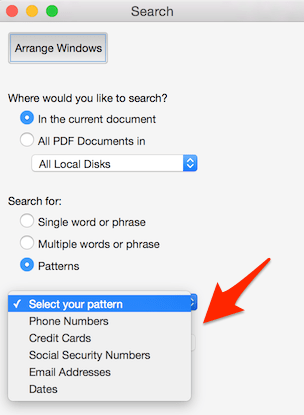
If you’re filing a long document with many possible references to confidential or sensitive information then, for peace of mind, it is worth performing a quick search using Acrobat’s Find Text feature.
Simply select Mark for Redaction followed by Find Text. This will open the Search dialog box on the left. Here, you can search for specific words (e.g. if there’s a name you need to redact), or for common patterns of sensitive information, such as credit card or social security numbers.
#2 Save as “Reduced Size PDF”
If your file is still very large after you’ve created it electronically, rather than by scanning, there are still some steps you can take. The simplest is to re-save your file as a reduced-size PDF.
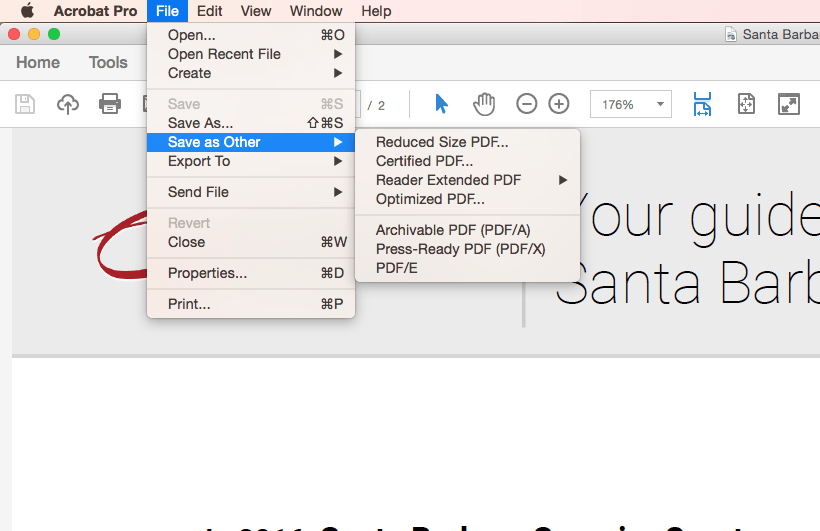
In the latest version of Adobe Acrobat, open the PDF you wish to re-save as a smaller file, choose File, Save as Other, and then Reduced Size PDF. You’ll be prompted to select the version compatibility you need and then you can click OK to save. We recommend setting your compatibility with at least Acrobat X, as that version is still widely used.
This method is quick and simple but be warned that it will reduce the quality of images and will remove digital signatures. If you want more control over how your PDF is compressed in Acrobat, use the optimization method described below instead.
#3 Use Adobe Acrobat’s PDF Optimizer
Sometimes you’ll want more control over which elements of your document are reduced in quality or removed. In these circumstances, you should choose the PDF optimizer tool.
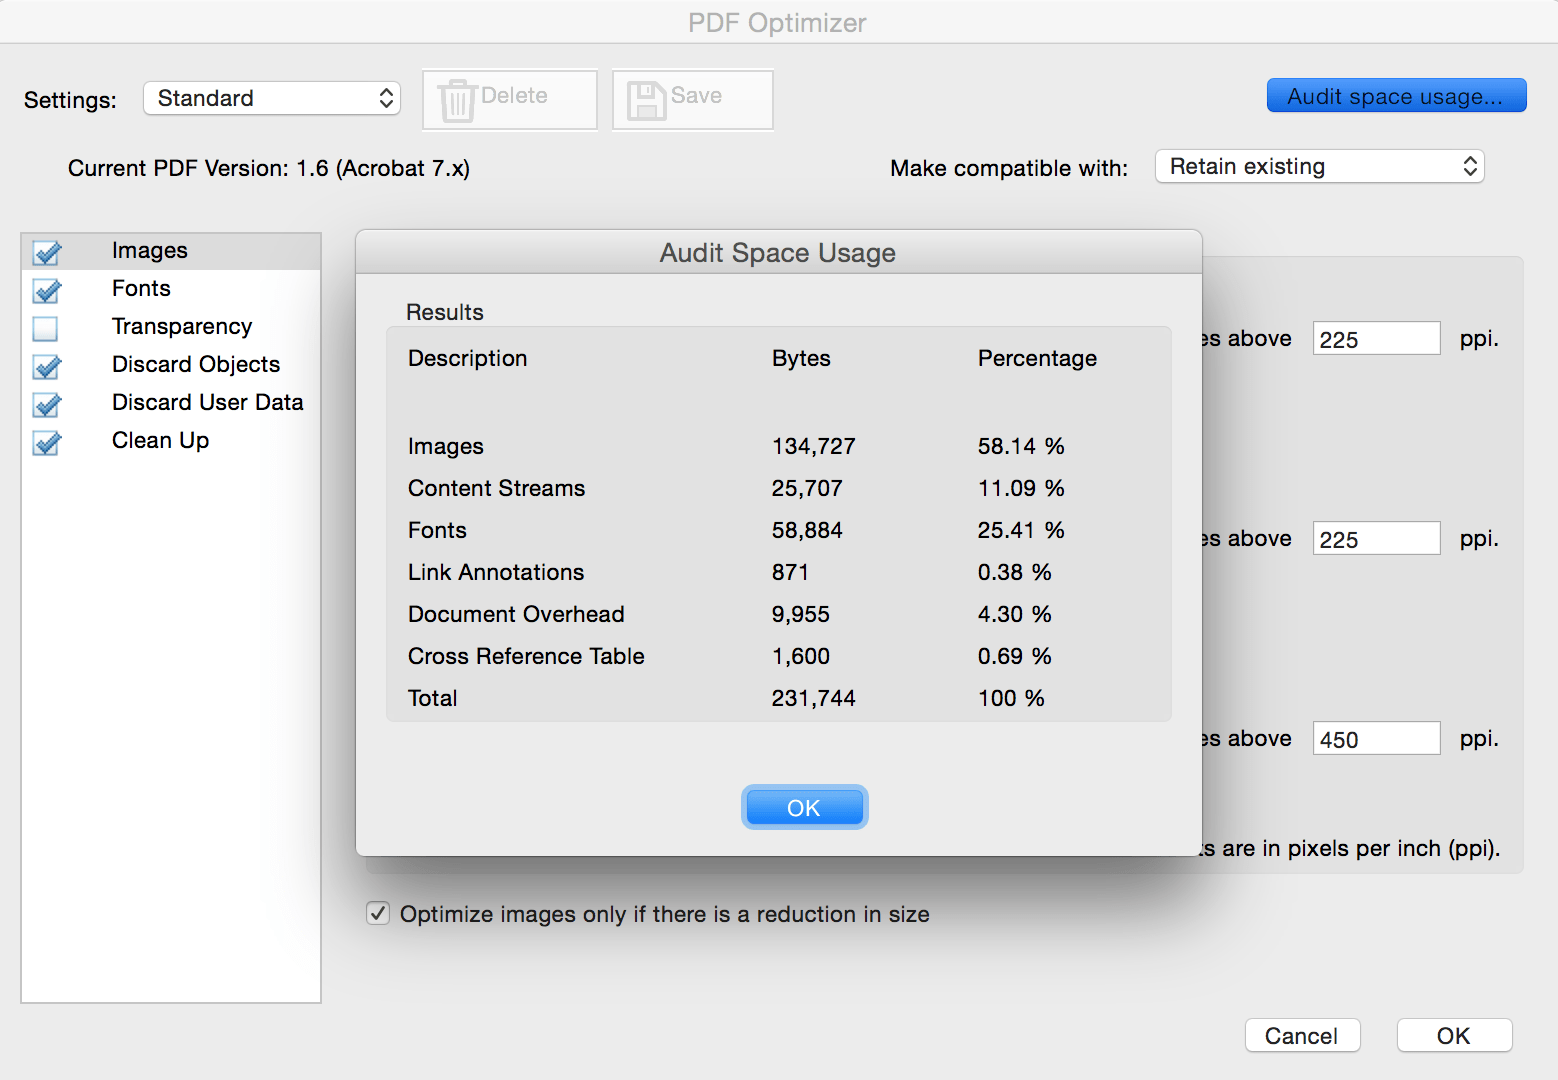
Before you optimize a file, it’s a good idea to audit the file’s space usage — review which elements, such as fonts, images, and so on, are using the most data. The results of this may give you ideas about where best to reduce file size.
To begin optimization, open your PDF in Acrobat, click File, Save as Other, and then Optimized PDF. In the dialog box that appears, click on Audit space usage in the top right-hand corner. You’ll see a table of information a bit like this:
The optimizer gives you complete control over the elements of your PDF that will be compressed. Select the checkbox next to a panel (e.g. Images, Fonts), and then select options in that panel. There’s a lot of choices, so it’s worth reading through the Adobe help file to understand what each option does.
Okay, we know that not everyone uses Adobe Acrobat. What options are available to you if you’re using other software or only the basic Adobe Reader? Here are two more options for reducing the size of your PDF file if you’re not using Acrobat.
#4 Reduce the size as you save in Word
In Word, to convert a document to PDF, you use the Save As option. This option generally produces a fairly small file, depending on the number of images in your document. However, if you find that your Word-converted PDF is still too large, there is a further option in Word that will produce a significantly smaller file. Here’s how to use it:
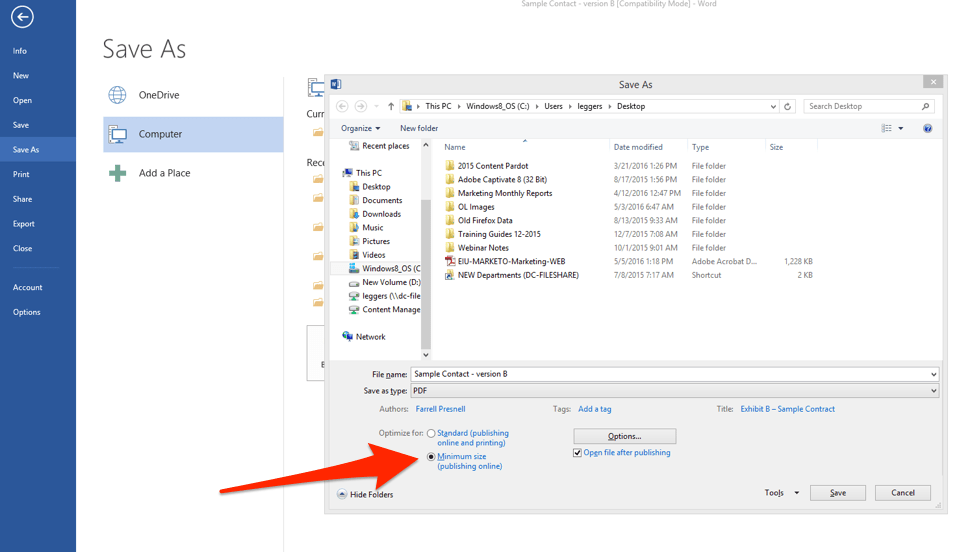
Open the Word document you are going to convert to PDF. Click on the File button and then Save As. In the Save as type menu, select PDF and enter your preferred file name. Here’s the extra step: where it says Optimize for at the bottom of the dialog box, select Minimum size (publishing online).
#5 Use a print-to-PDF tool
Other (non-Adobe) PDF tools generally contain features that will reduce the size of your PDF. However, if you’re looking for a free option, there are some available. Currently, the most downloaded free PDF creator (according to download.com) is PrimoPDF.
Once you’ve installed PrimoPDF, simply open the PDF you wish to compress (in Acrobat Reader, or a web browser, for example), press Ctrl+P to open the print dialog, select PrimoPDF from the list of available printers, and then click Create PDF.
Note that this method, like simply saving as a reduced-size PDF in Adobe Acrobat, reduces image quality and resolution.
If your file is still very large after you’ve created it electronically, rather than by scanning, there are still some steps you can take. The simplest is to re-save your file as a reduced-size PDF.
In the latest version of Adobe Acrobat, open the PDF you wish to re-save as a smaller file, choose File, Save as Other, and then Reduced Size PDF. You’ll be prompted to select the version compatibility you need and then you can click OK to save. We recommend setting your compatibility with at least Acrobat X, as that version is still widely used.
This method is quick and simple but be warned that it will reduce the quality of images and will remove digital signatures. If you want more control over how your PDF is compressed in Acrobat, use the optimization method described below instead.
#3 Use Adobe Acrobat’s PDF Optimizer
Sometimes you’ll want more control over which elements of your document are reduced in quality or removed. In these circumstances, you should choose the PDF optimizer tool.
Before you optimize a file, it’s a good idea to audit the file’s space usage — review which elements, such as fonts, images, and so on, are using the most data. The results of this may give you ideas about where best to reduce file size.
To begin optimization, open your PDF in Acrobat, click File, Save as Other, and then Optimized PDF. In the dialog box that appears, click on Audit space usage in the top right-hand corner. You’ll see a table of information a bit like this:
The optimizer gives you complete control over the elements of your PDF that will be compressed. Select the checkbox next to a panel (e.g. Images, Fonts), and then select options in that panel. There’s a lot of choices, so it’s worth reading through the Adobe help file to understand what each option does.
Okay, we know that not everyone uses Adobe Acrobat. What options are available to you if you’re using other software or only the basic Adobe Reader? Here are two more options for reducing the size of your PDF file if you’re not using Acrobat.
#4 Reduce the size as you save in Word
In Word, to convert a document to PDF, you use the Save As option. This option generally produces a fairly small file, depending on the number of images in your document. However, if you find that your Word-converted PDF is still too large, there is a further option in Word that will produce a significantly smaller file. Here’s how to use it:
Open the Word document you are going to convert to PDF. Click on the File button and then Save As. In the Save as type menu, select PDF and enter your preferred file name. Here’s the extra step: where it says Optimize for at the bottom of the dialog box, select Minimum size (publishing online).
#5 Use a print-to-PDF tool
Other (non-Adobe) PDF tools generally contain features that will reduce the size of your PDF. However, if you’re looking for a free option, there are some available. Currently, the most downloaded free PDF creator (according to download.com) is PrimoPDF.
Once you’ve installed PrimoPDF, simply open the PDF you wish to compress (in Acrobat Reader, or a web browser, for example), press Ctrl+P to open the print dialog, select PrimoPDF from the list of available printers, and then click Create PDF.
Note that this method, like simply saving as a reduced-size PDF in Adobe Acrobat, reduces image quality and resolution.


0 Comments